
ecsimsw
Scheduler 적용 배경 / 스레드 풀과 비동기 처리 본문
스케줄러
정기적으로 실행해야 하는 테스크가 있을 수 있다. 일정 시간 간격으로 로직을 실행하거나, 일정 스케줄러는 그런 테스크를 처리하기에 유용하게 사용할 수 있다. 예를 들면 10초마다 한 번씩 혹은 매월 1일마다 한 번씩 지정한 로직을 수행하도록 하는 것이다.
이번 프로젝트에서 매일 한번씩 정산하는 로직을 수행해야 한다. 처음에는 아래처럼 단순히 요청 처리를 위한 스레드와 별도의 스레드를 생성하고 그 안에서 무한정 시간을 비교하는 로직을 수행하려 했으나, 스프링의 스케줄러를 사용하면 직접 스레드를 관리하지 않아도 되고, 시간 비교를 효율적으로 할 수 있을 것이라는 생각에 스프링 스케줄러를 사용하게 되었다.

스프링 프레임워크에서 Quartz 라이브러리를 사용할 수 있다. 스프링 프레임워크에서 기본적으로 제공하는 스케줄러보다 보다 정교하게 잡 스케줄링을 다룰 수 있다고 한다. 반대로 설정과 사용에 번거롭고, 무엇보다 현재 필요한 기능은 기본 제공 스케줄러에서 모두 처리할 수 있어 Quartz 라이브러리 없이 스프링 스케줄러를 사용하기로 결정하였다.
혹시 당신이 스케줄링으로 필요한게 단순히 특정 시간에 또는 특정 간격으로 비동기 수행 정도이면 그냥 스프링에서 제공하는 @Scheduled를 사용해도 좋을 것 같다.
아래 링크를 참고하면 좋을 것 같은데, 답변 중 동적으로 수행 시간 변화를 필요하면 Quartz를 사용하라는 답변이 있는데 동적으로 수행 간격, 수행 시점 변경도 @Scheduled로 처리가 가능하니 해당 부분에 관해선 다른 문서를 참고해보길 바란다.
https://stackoverflow.com/questions/4385719/spring-scheduling-scheduled-vs-quartz
스레드 풀 설정
구체적인 스프링 스케줄러를 사용하는 방법은 안 다룰 생각이다. 워낙 자료가 많고 쉬워서 그저 어노테이션 달고, 수행 간격, 시점을 지정하기만 하면 되니 말이다. 그것보다 스케줄러 자체를 다루면서 재밌었던 부분을 소개하고자 한다.
아래 코드는 1초에 한번씩 문자열을 출력하는 두 작업을 실행하는 코드이다. 아마 의도는 5초간 대기 시간이 있는 test1과 별개로 test2는 1초마다 수행되길 바랬을 텐데 동작하는 것을 보면 그렇지 않다. test1이 끝나야 test2가 실행된다.
코드에서 스포일러를 했듯이 두 task가 같은 스레드(scheduling-1)에서 처리되어서 그렇다. 한 스레드에서 두 테스크가 실행되고 있으므로 결국 test1이 끝나야지만 test2가 실행될 수 있는 구조인 것이다.
@Component
public class TestScheduler {

    @Scheduled(fixedDelay = 1000)  // 1초마다 수행
    public void test1() throws InterruptedException {
        Thread.sleep(5000); // 5초의 작업 시간으로 가정
        System.out.println("scheduling1 with : " + Thread.currentThread().getName());
    }

    @Scheduled(fixedDelay = 1000)  // 1초마다 수행
    public void test2() {
        System.out.println("scheduling2 with : " + Thread.currentThread().getName());
    }
}

scheduling1 with : scheduling-1
scheduling2 with : scheduling-1
scheduling1 with : scheduling-1
scheduling2 with : scheduling-1
scheduling1 with : scheduling-1
scheduling2 with : scheduling-1
scheduling1 with : scheduling-1
해결 방법은 간단하다. test1과 test2가 서로 다른 스레드를 타면 더 이상 test2가 test1를 기다리지 않고 요청을 수행할 수 있을 것이다.
아래 예시는 SchedulingConfigurer 설정으로 pool size = 5인 스레드 풀에서 스레드를 가져와 테스크를 처리하도록 한 것이다. 출력 예시에서처럼 각 테스크는 thread1~5 사이의 서로 다른 스레드에서 처리되고, 더 이상 test2가 test1의 처리 시간에 종속되지 않는 것을 볼 수 있다.
@Configuration
class SchedulerConfig implements SchedulingConfigurer {

    @Override
    public void configureTasks(ScheduledTaskRegistrar taskRegistrar) {
        ThreadPoolTaskScheduler threadPoolTaskScheduler = new ThreadPoolTaskScheduler();

        threadPoolTaskScheduler.setPoolSize(5);
        threadPoolTaskScheduler.setThreadGroupName("scheduler thread pool");
        threadPoolTaskScheduler.setThreadNamePrefix("scheduler-thread-");
        threadPoolTaskScheduler.initialize();

        taskRegistrar.setTaskScheduler(threadPoolTaskScheduler);
    }
}

scheduling1 with : scheduler-thread-1
scheduling2 with : scheduler-thread-2
scheduling2 with : scheduler-thread-4
scheduling2 with : scheduler-thread-3
scheduling2 with : scheduler-thread-3
scheduling2 with : scheduler-thread-3
scheduling2 with : scheduler-thread-3
scheduling1 with : scheduler-thread-5
비동기 설정
스레드 풀 설정을 마치면 이제 개발자가 의도한대로 스케줄러가 작동할까? 스레드 풀 설정이 되는 상황에서, 이번에는 test1만 보자. 아래 코드는 스케줄링 설정대로 1초마다 수행될까?
@Component
public class TestScheduler {

    @Scheduled(fixedDelay = 1000)
    public void test1() throws InterruptedException {
        System.out.println("start with : " + Thread.currentThread().getName());
        Thread.sleep(5000);
        System.out.println("end with : " + Thread.currentThread().getName());
    }
}

start with : scheduler-thread-1
end with : scheduler-thread-1
start with : scheduler-thread-2
end with : scheduler-thread-2
start with : scheduler-thread-1
end with : scheduler-thread-1
start with : scheduler-thread-3
end with : scheduler-thread-3
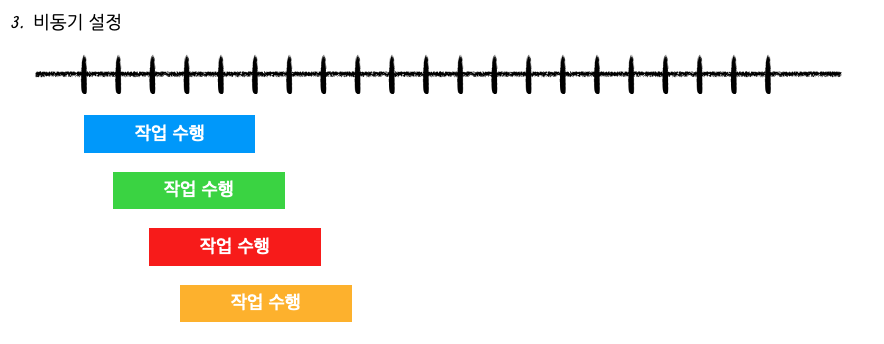
안된다. 그저 다른 스레드로 처리할 뿐 각 작업은 동기적으로 처리하고 있다. 아래 그림에서 1번은 스레드 풀 설정을 하지 않았던 경우, 2번은 스레드 풀 설정으로 서로 다른 스레드로 작업을 수행하는 경우를 표시해보았다.
의도한 대로 작업 수행에 걸리는 시간과 상관없이 매 1초마다 작업 수행을 시작하고 싶다면 test1를 비동기로 처리 해야 한다. 이렇게 Spring의 @Async로 test1의 작업을 수행할 경우, Spring이 비동기 처리를 위한 스레드 풀에서 스레드를 가져다 처리를 하게 된다.
마찬가지로 이 스레드 풀에 대한 설정이 가능하다. 'SimpleAsyncTaskExecutor'를 키워드로 비동기 테스크 스레드 풀에 대한 설정 방법을 찾아보길 바란다.
@Component
public class TestScheduler {

    @Async
    @Scheduled(fixedDelay = 1000)
    public void test1() {
        ...
    }
}

@EnableAsync
@EnableScheduling
@SpringBootApplication
public class GiggleApplication {
  ...
}

start with : task-1
start with : task-2
start with : task-3
start with : task-4
start with : task-5
start with : task-6
end with : task-1
end with : task-2
start with : task-7
end with : task-3
start with : task-8
end with : task-4
'Architecture > Application' 카테고리의 다른 글
| RepeatableRead 에서 발생할 수 있는 동시성 문제와 락 (8) | 2024.01.10 |
|---|---|
| Future 를 활용한 비동기 이미지 비동기 업로드 흐름과 시연 (0) | 2023.11.28 |
| 레디스 주요 옵션과 사용 전략 (4) | 2023.11.20 |
| 도메인 이벤트를 이용하여 의존성 분리 연습 (4) | 2022.01.12 |
| 대부분 못 지키고 있는 REST 제약조건 (4) | 2021.07.22 |